VHelper documentation
How-to guide
Get started quickly, find common commands, and follow practical workflows for routing, visualization, productivity, and model QA/QC.
Start here
Find the workflow you need.
Use the topic lists below to jump directly to detailed instructions.
Major Features Video
Beginner Get Started Video
Install & Run
General
- How to Open Options Dialog?
- How to Open VISSIM File?
- How to Save VISSIM File?
- How to Zoom in/Zoom out and Pan the Map?
- How to Show the Full Extends of the Map?
- How to Toggle Link Display Type among Center Line, Normal Mode and All Center Lines?
- How to Show/Hide Lane Markings?
- How to Toggle Link Display Color among Link Type Color, Gray, Speed Based?
- How to Turn on/off the Arrow?
- How to Show/Hide Label for Link or Connector?
- How to Toggle showing Label among volume, speed and IDs?
- How to Change Background, Link or Label Color?
Profiling & Visualization
- How to Calculate Demand Volume Based on Vehicle Inputs & Static Routing?
- How to Calculate Link Desired Speed & Display in User Specified Color?
- How to Show Volume Bandwidth Map?
- How to Show Speed Contour Heatmap?
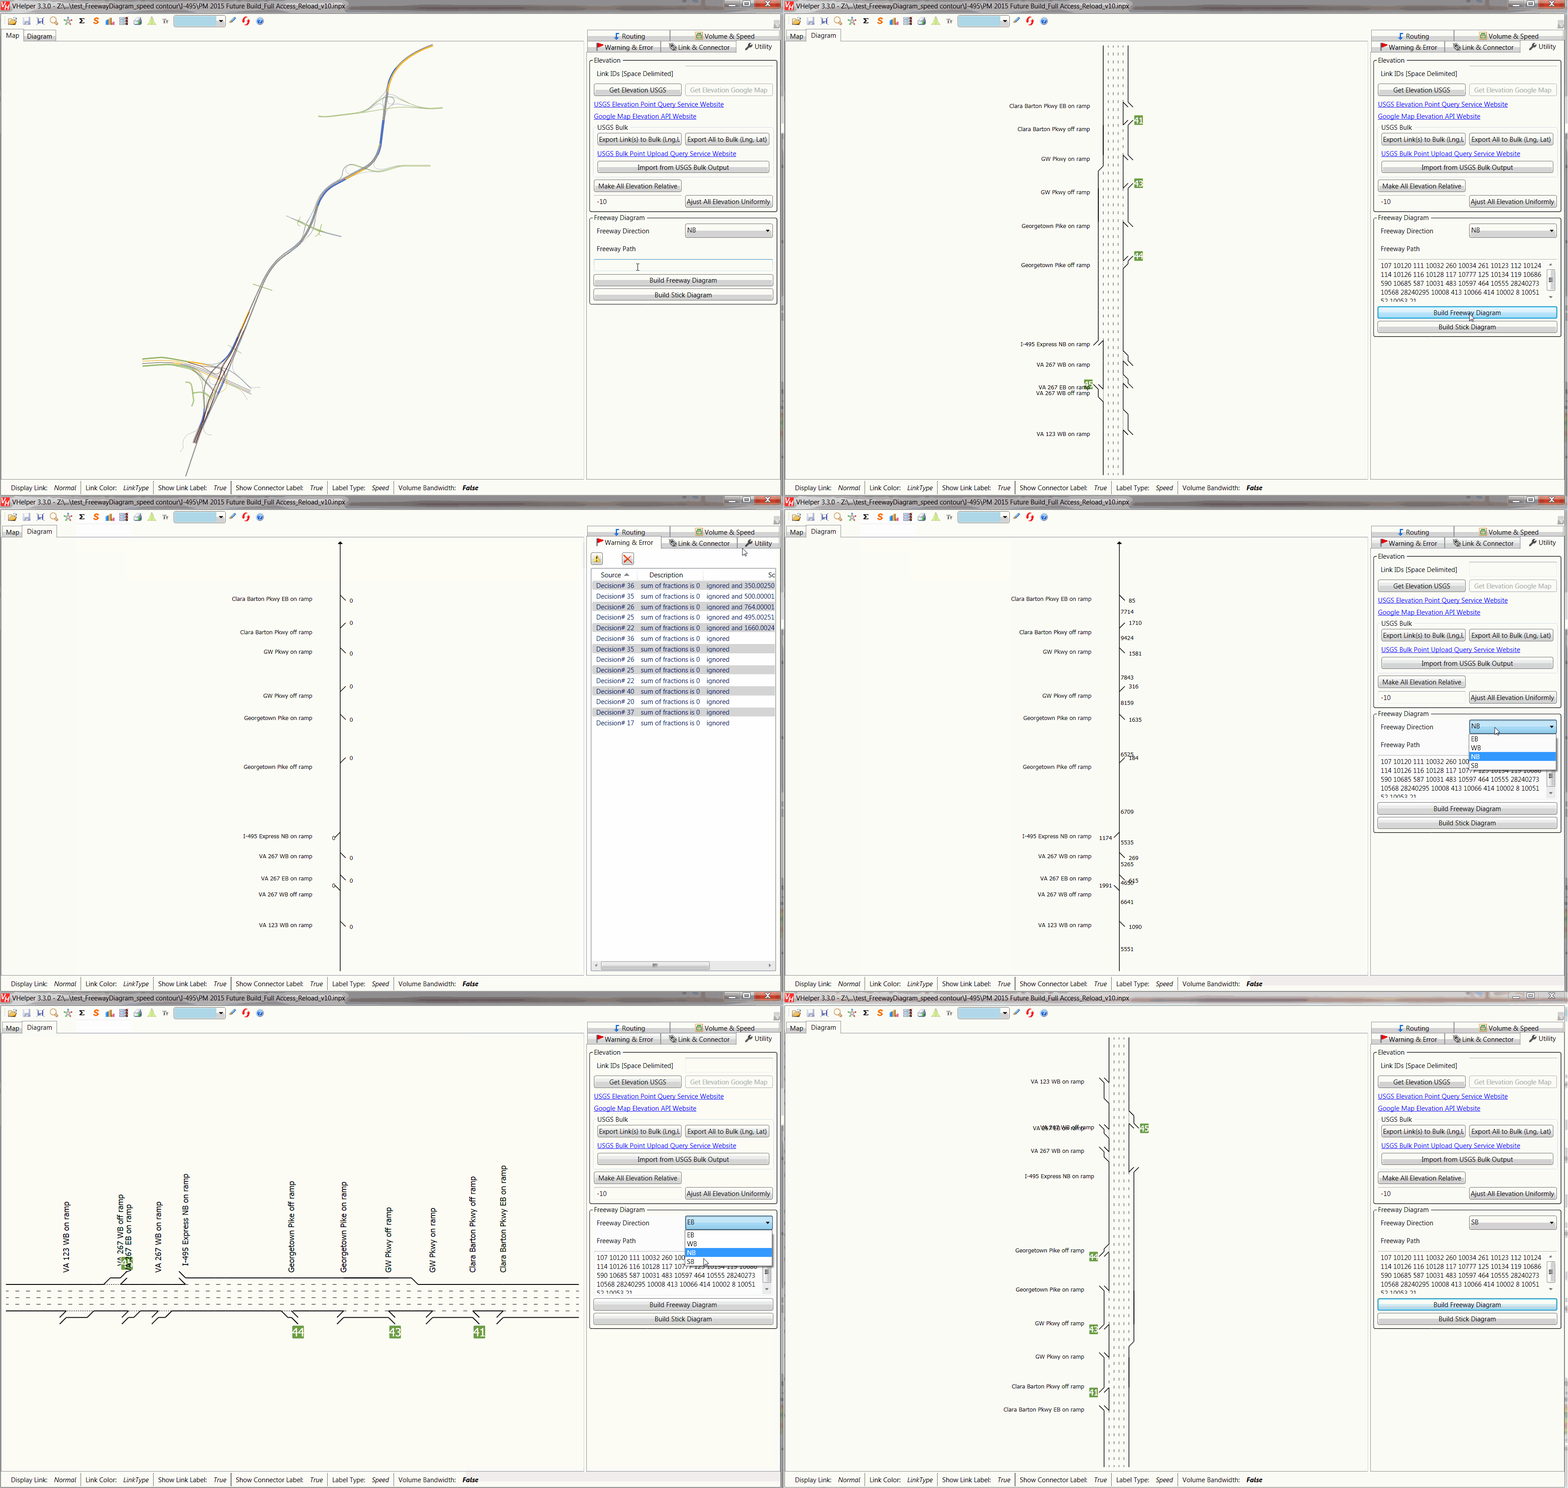
- How to Show Freeway Diagram & Demand Stick Diagram ?
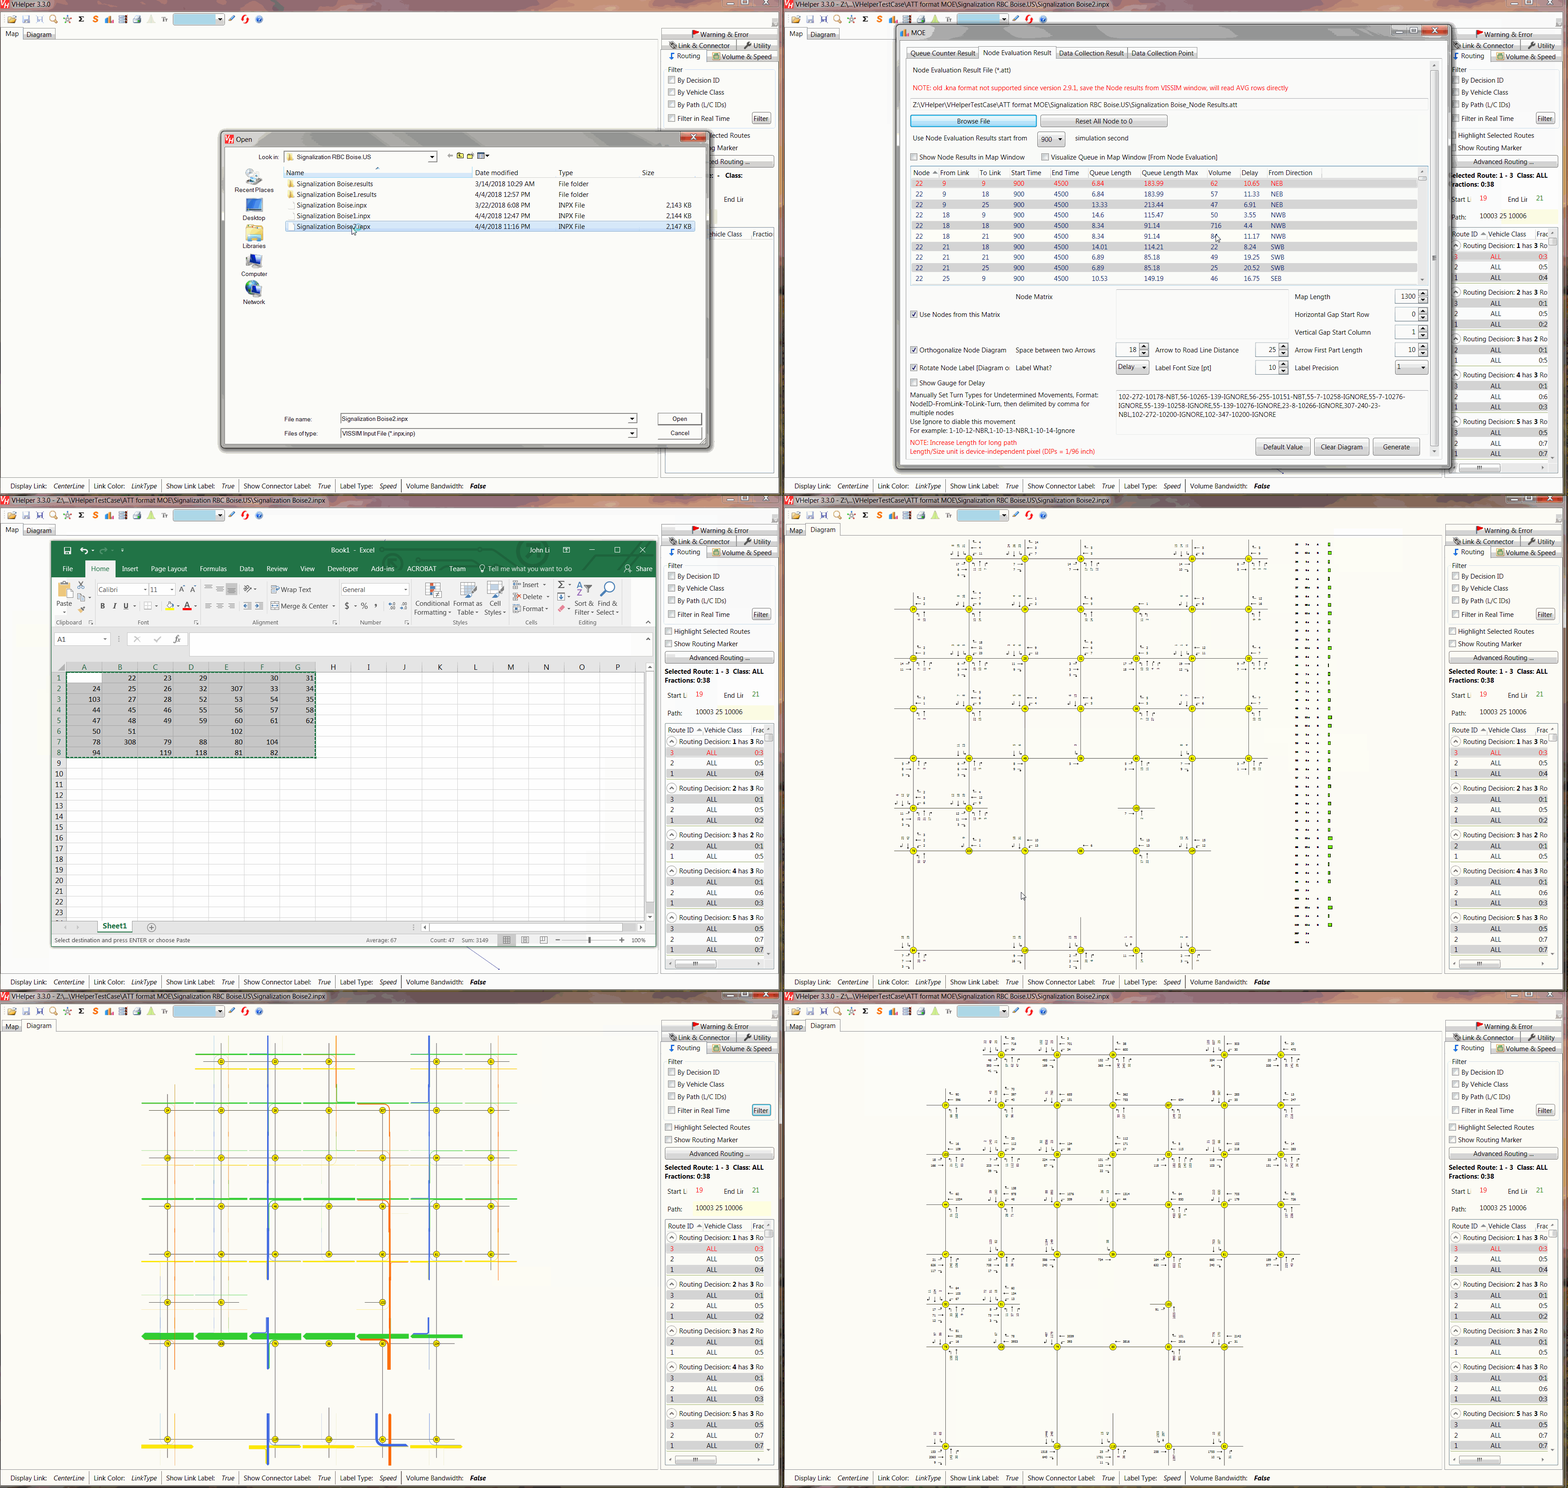
- How to Show Intersection Diagram with Volume or Delays ?
- How to Show Volume of Specific Vehicle Type?
- How to Export Calculated Link Demand Volume?
- How to Import Back User Defined Link Volume?
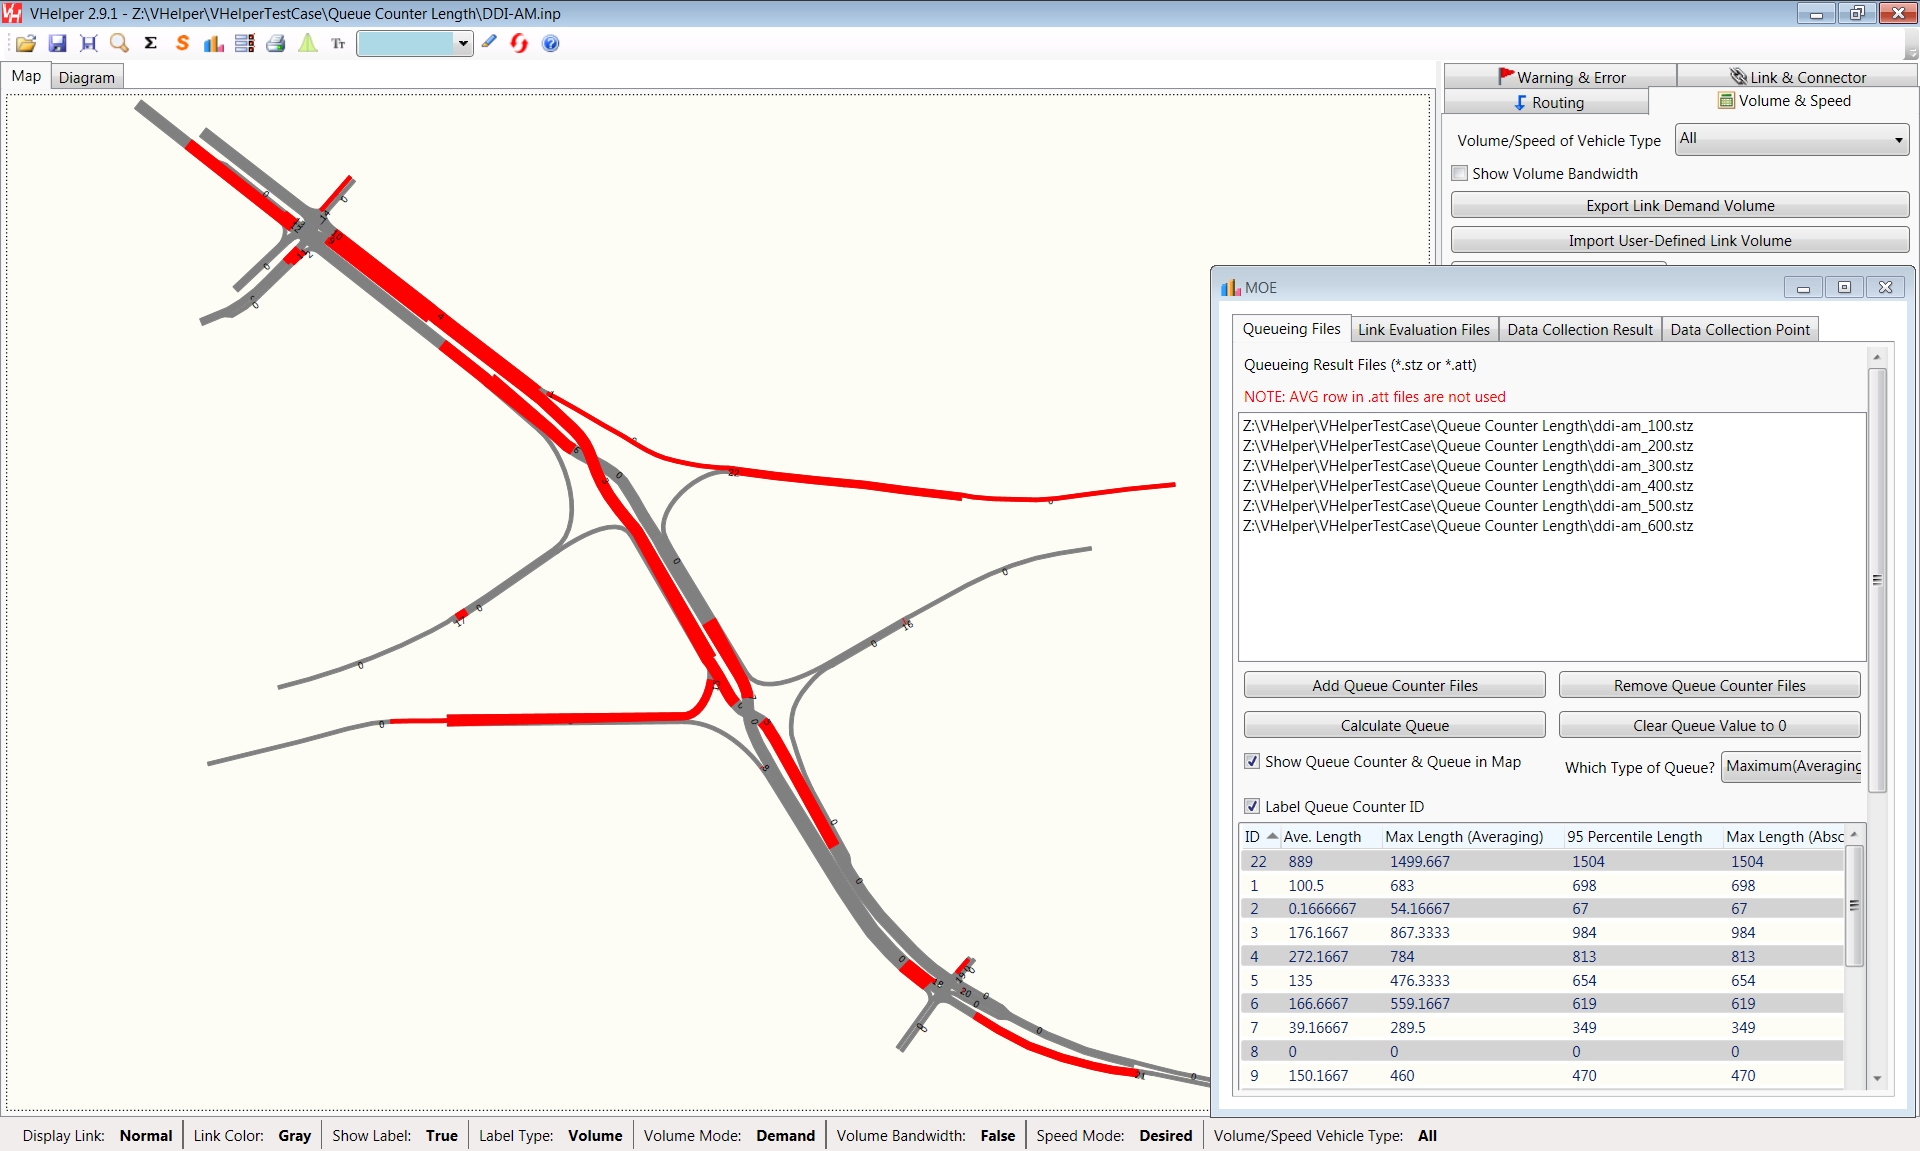
- How to Draw & Visualize Queue based on Queue MOE Result Files?
Productivity
- How to Create Static Routings from OD Demand Matrix?
- How to Create Static Routings from VISUM Path?
- How to Create Vehicle Inputs by importing Tab Delimited Text File(s)?
- How to Create Vehicle Compositions by importing Tab Delimited Text File(s)?
- How to Combine Static Routings?
- How to Filter Routes?
- How to Find & Replace Routes?
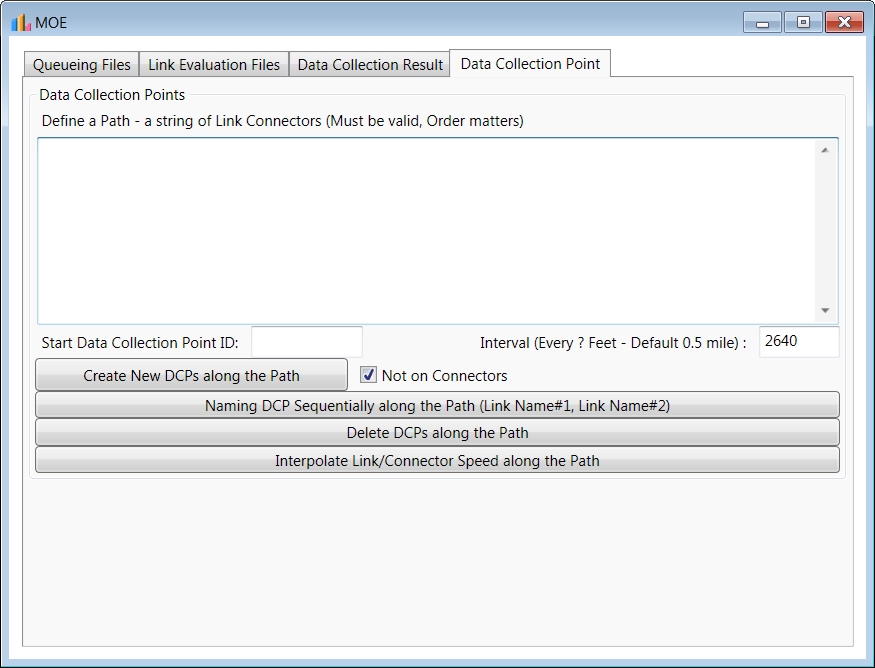
- How to Create Data Collection Points along a Path?
- How to Quickly Manipulate Lane Cloesures along a User Defined Path (a string of Link Connector IDs)?
QA/QC
VAPPad
Click here for Introduction and VAP language tutorial1.0
Step-by-step instructions
VHelper workflows
How do I run VHelper after downloading?
- No installation required
- Unpack the downloaded zip file to a local folder, then double click vhelper.exe to run
- You can keep multiple versions, as long as they are in separate folder
VHelper can not start
VHelper® is compiled to .NET 3.5 framework. By default, Windows 7 comes with .NET 3.5 preloaded. VHelper won't start if your machine don't have Microsoft .NET 3.5 Run time installed. Please Click this link to download and install Microsoft .NET Framework 3.5 if you don't have it. If you still have problem, please contact me at support@trananswers.com
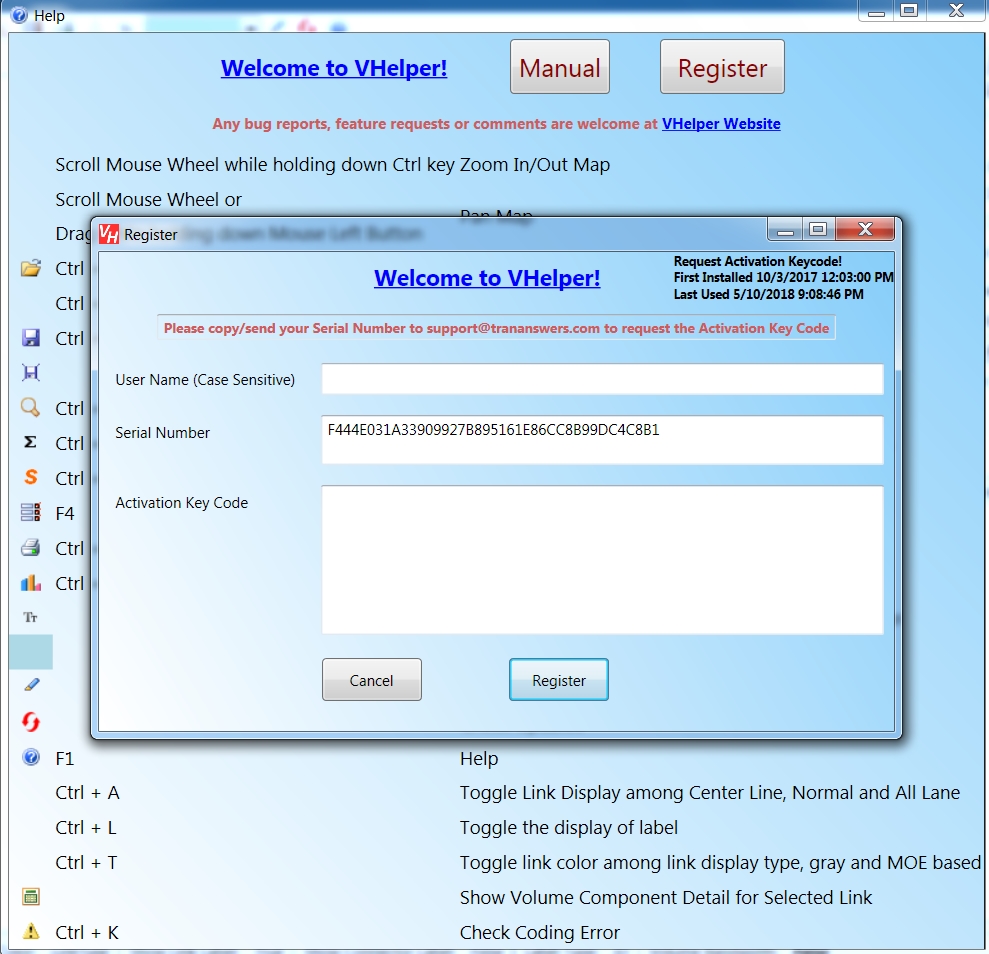
How do I register?
- Click Help button or Press F1 shortcut key
- Click button to show Register Window
- Email your Serial Number to support@trananswers.com, fill in the activation Key Code (will be provided after the payment received)
- Click button to Register
How to Open Options Dialog?
- Click Options button
- or Press F4 shortcut key
How to Open VISSIM File?
- Click Open button
- or Press Ctrl + O shortcut key
- or Drag and Drop VISSIM .inp or .inpx files into the Map Window
How to Save VISSIM File?
- Click Save button
- or Press Ctrl + S shortcut key
- or if you want to save to another file, Click Save As button
How to Zoom in/Zoom out and Pan the Map?
- Scroll Mouse Wheel whiling holding down Ctrl Key to Zoom in/out
- Scroll Mouse Wheel or Left Drag (Drag whiling holding down Left Mouse Button) to Pan the map
- or if scroll bar appears, click them to Pan the map
How to Show the Full Extends of the Map?
- Click Zoom All Button

- or Press Ctrl + W shortcut key
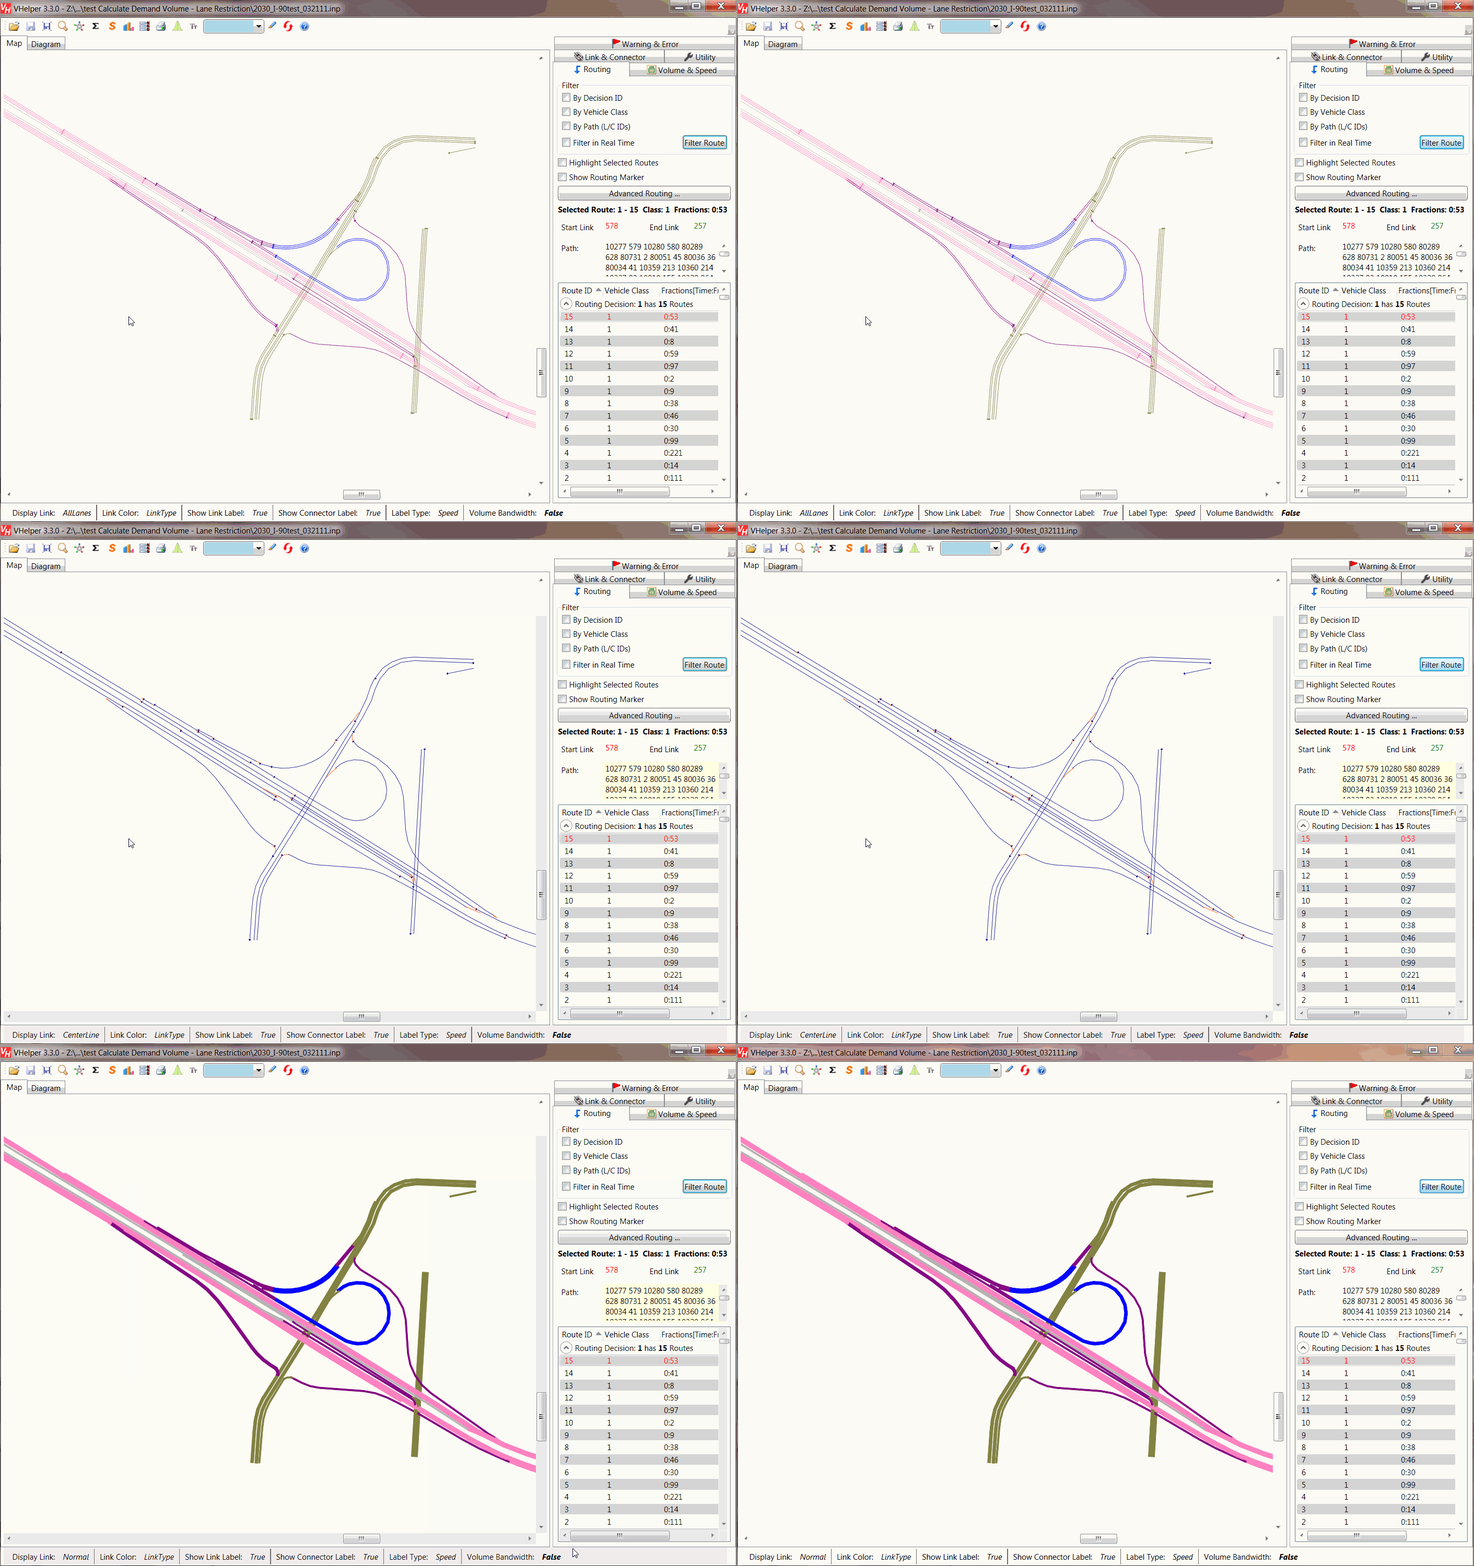
How to Toggle Link Display Type among Center Line, Normal Mode and All Center Lines?
- Press Ctrl + A shortcut key
- or Open Options Dialog (hit
F4 shortcut key or Click Options Button
 ), Change it under View Tab -> Link Display -> Link
Mode
), Change it under View Tab -> Link Display -> Link
Mode
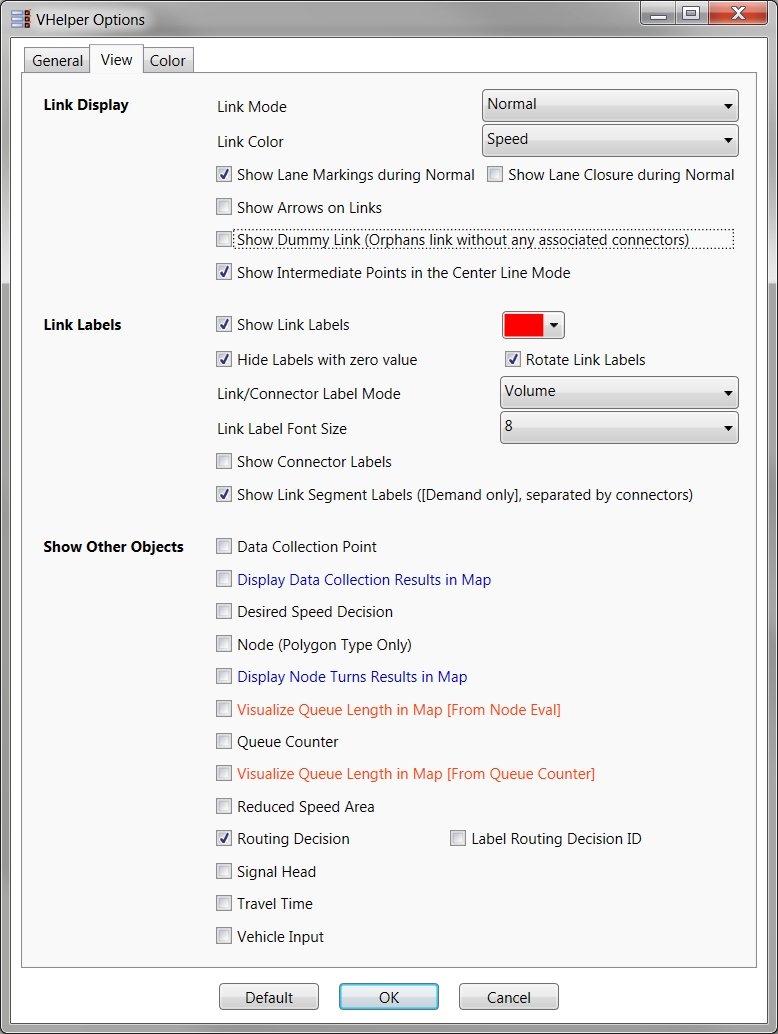
How to Show/Hide Lane Markings?
Open Options Dialog, Check on/off Show Lane Markings checkbox under Link DisplayHow to Toggle Link Display Color among Link Type Color, Gray, Speed Based?
- Press Ctrl + T shortcut key
- or Open Options Dialog, Change it under Link Display -> Show Link Color dropdown box
- NOTE: in order to show correct speed based color, the user need Calculate Speed first
How to Turn on/off the Arrow?
Open Options Dialog, Check on/off Draw Arrows to Show Direction checkbox under Link DisplayHow to Show/Hide Label for Link or Connector?
- Press Ctrl + L shortcut key
- or Open Options Dialog, Check on/off Show Labels checkbox
How to Toggle showing Label among volume, speed and IDs?
Open Options Dialog, Change it under Label Mode dropdown boxHow to Change Background, Link or Label Color?
Open Options Dialog, go to Color Tab, Change it from there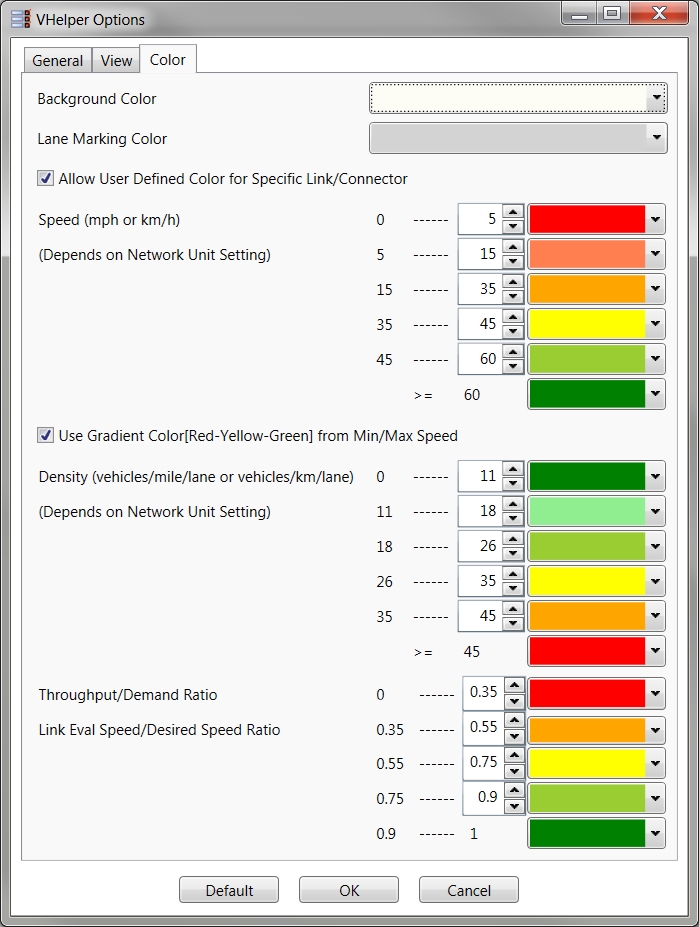
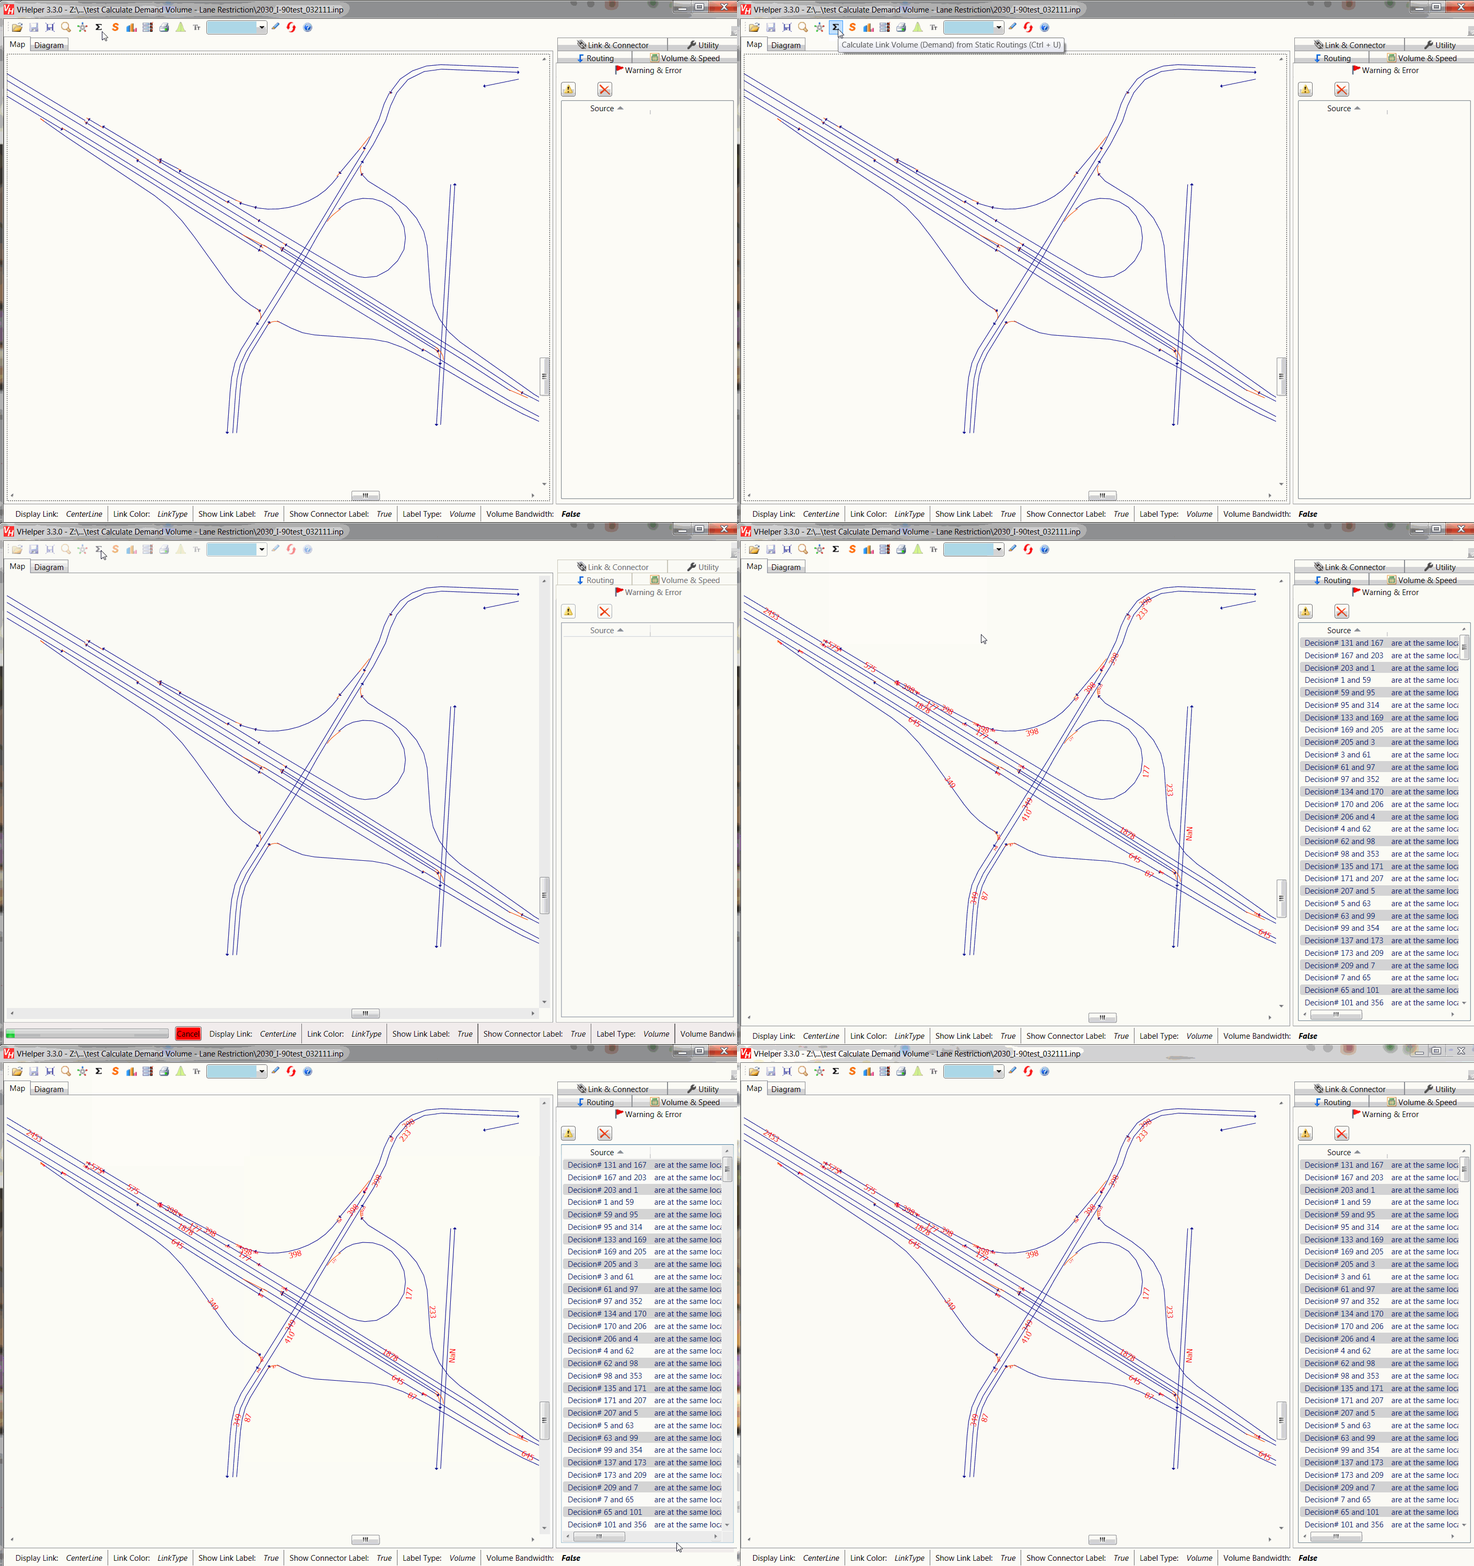
How to Calculate Demand Volume Based on Vehicle Inputs & Static Routing?
- Click Calc Volume button
- Or Press Ctrl + U shortcut key
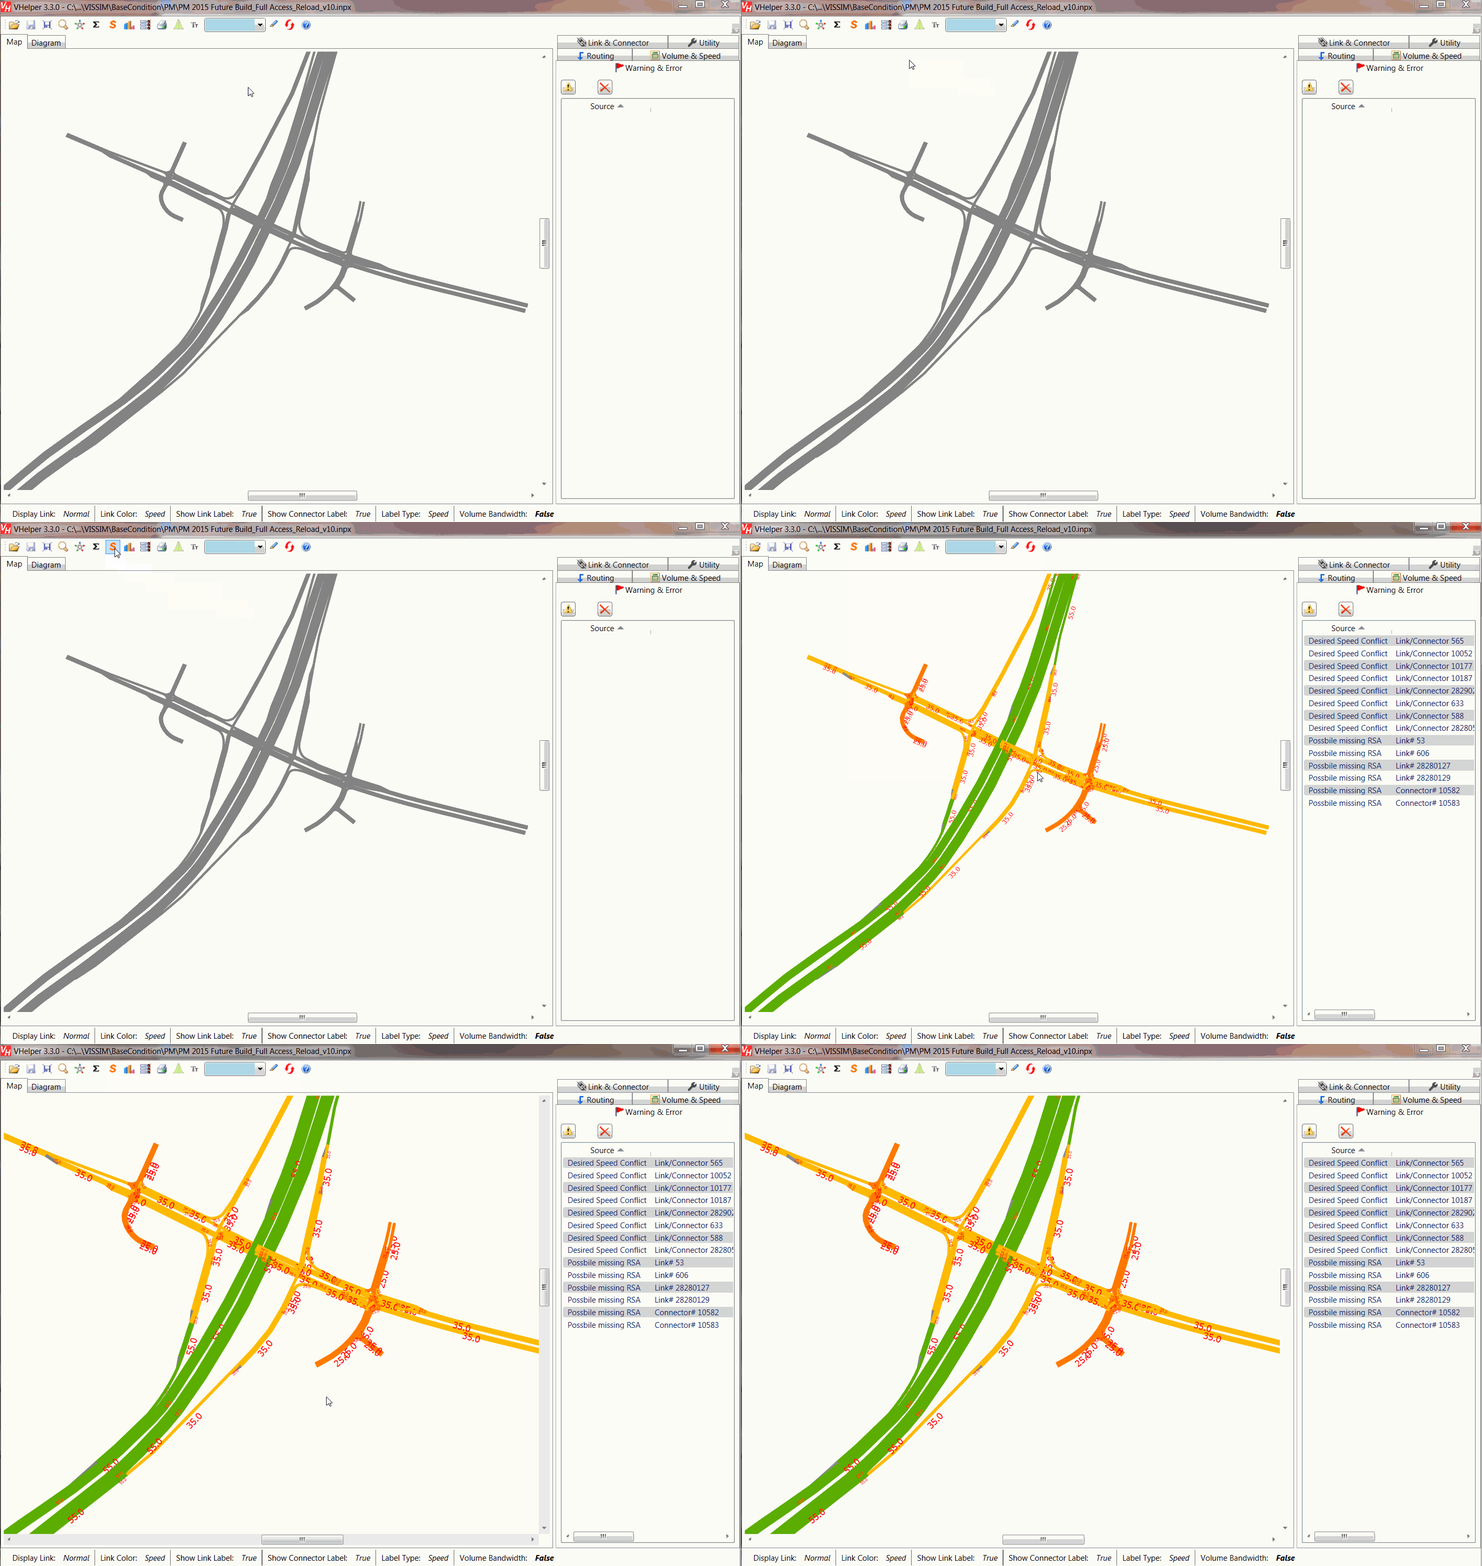
How to Calculate Link Desired Speed & Display in User Specified Color?
- Click Calc Speed button
- or Press Ctrl + Y shortcut key
- Under Options -> Color Tab, Change the colors for speed range
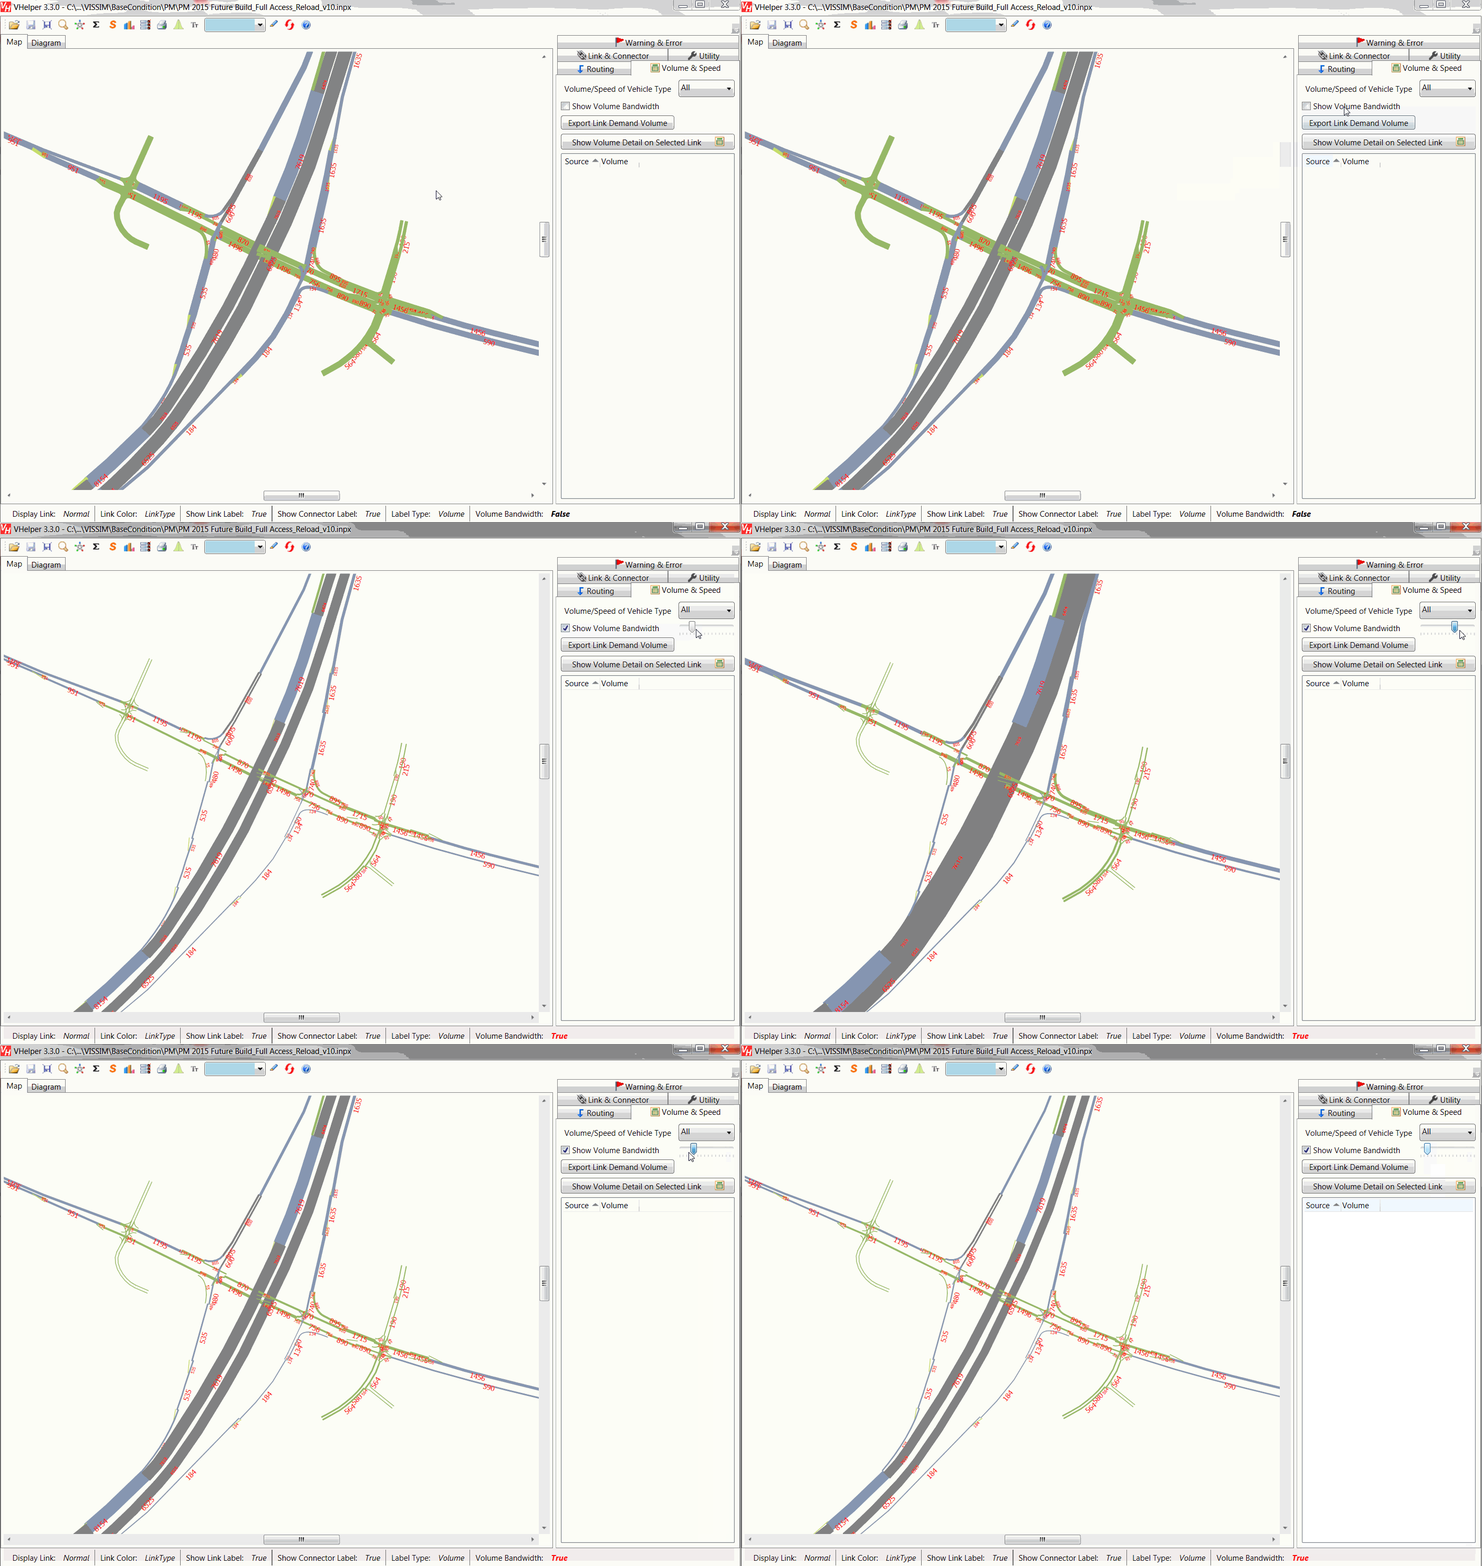
How to Show Volume Bandwidth Map?
- Calculate demand volume
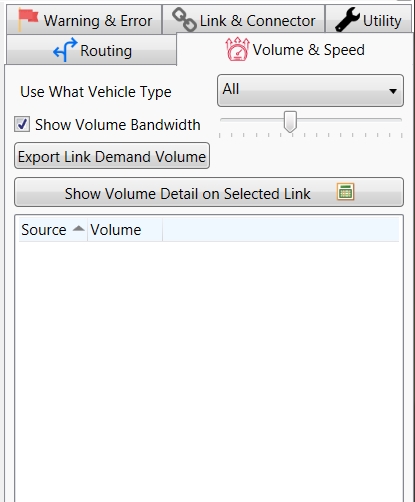
- Under Routing & Volume Tab, Check on/off Show Volume Bandwidth checkbox
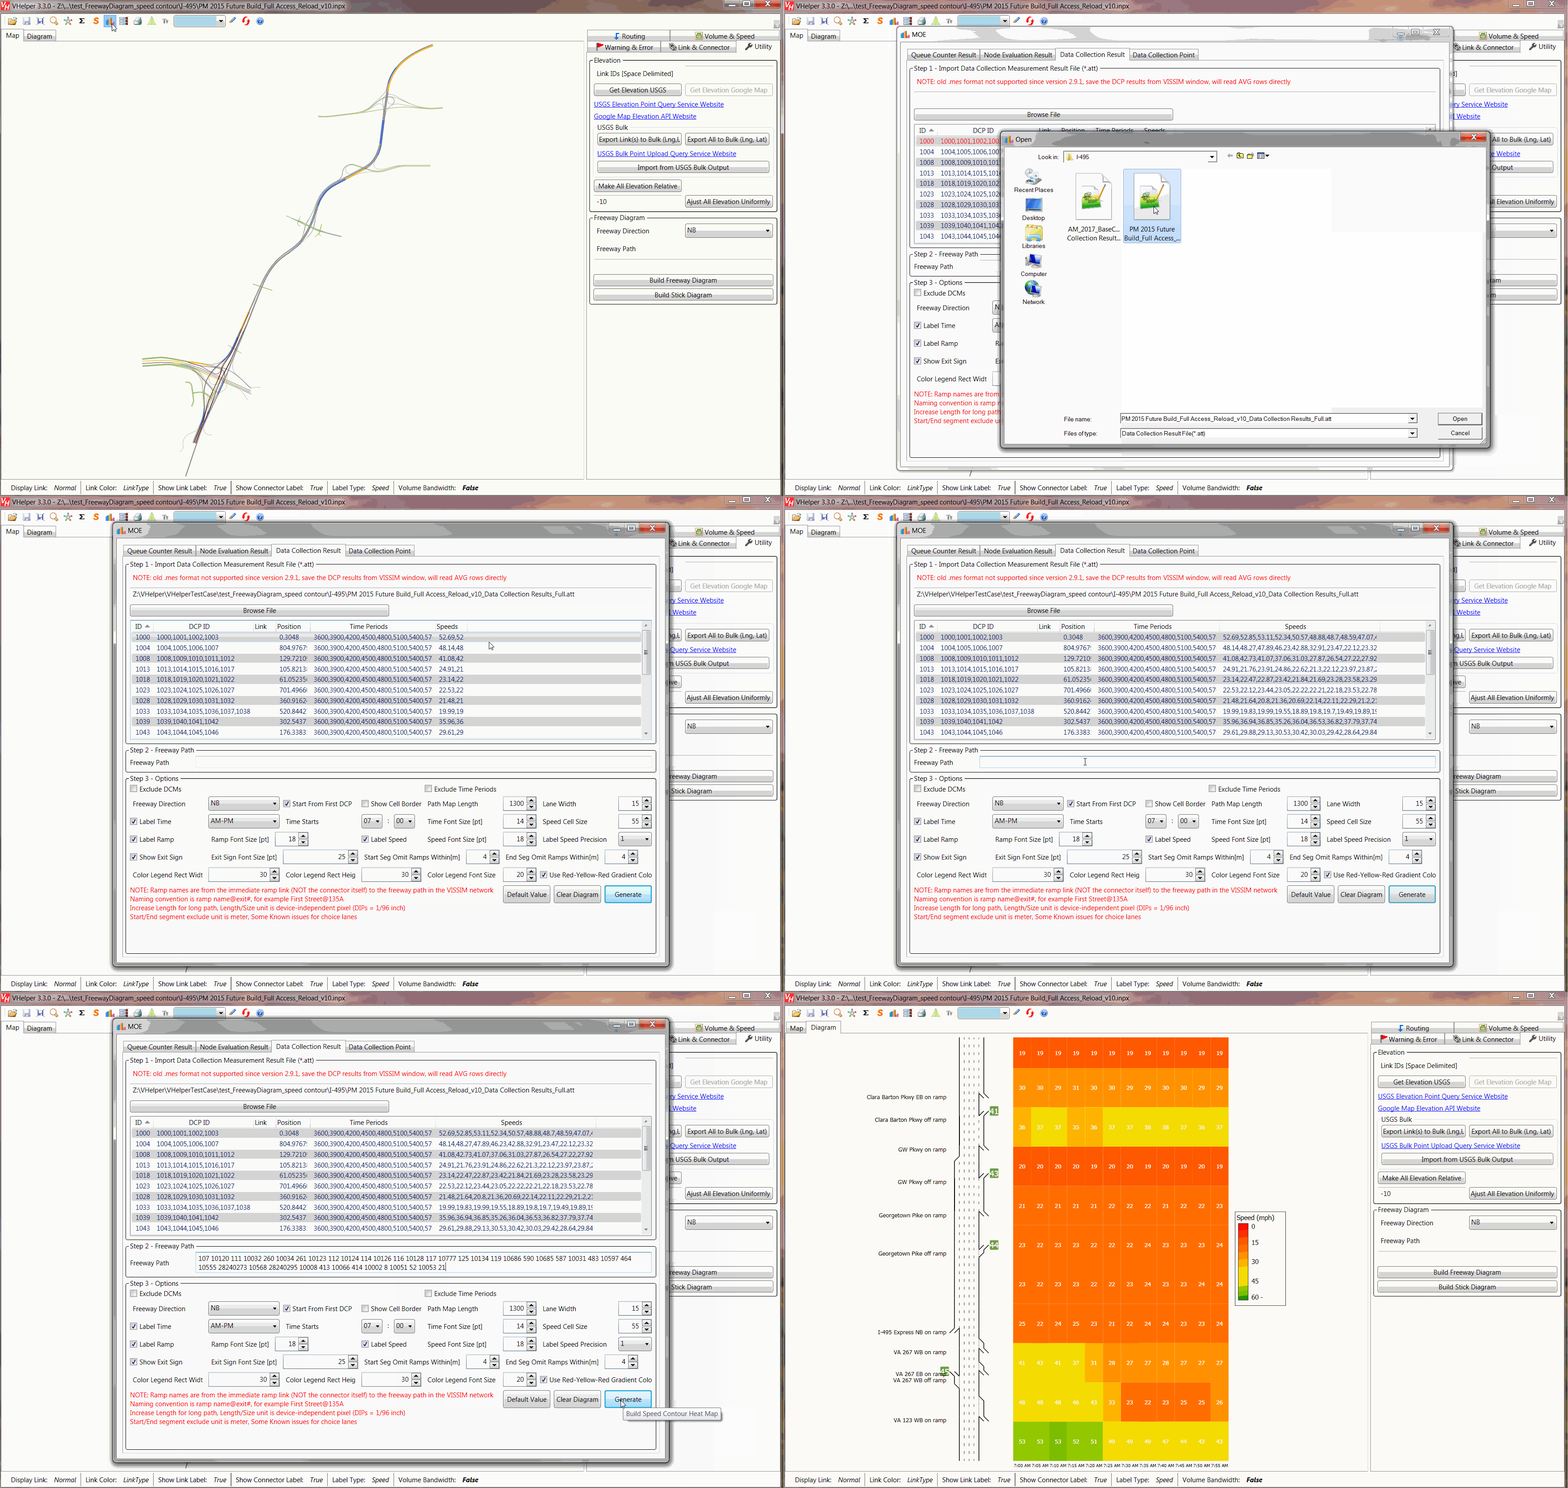
How to Show Speed Contour Heatmap?
- Click MOE Button
 to open MOE Dialog
- Under Data Collection Result tab, Browse the .att file saved from VISSIM to bring in Data Collection Measurement results
- Input the freeway path (space separated Link/Connector IDs)
- Click Button
- You can adjust font size, turn on/off border etc. in the options

How to Show Freeway Diagram & Demand Stick Diagram ?
- Under "Freeway Diagram" of right side Utility Tab, input the freeway path (Link/Connector IDs)
- Click Build Freeway Diagram button
- You need calculate demand volume first, if you to show demand stick diagram
How to Show Intersection Diagram with Volume or Delays ?
- Click MOE Button to open MOE Dialog
- Under Node Evaluation Result tab, browse .att file saved from VISSIM to bring in the Node Evaluation results
- Input Node Matrix, tab delimited text to denote intersection relationship, best copy from Excel
- Click Button
- You can choose to display volume or delay, adjust font size etc in the options
- If you check off Use Nodes from this Matrix, VHelper will display all Nodes by ID in a tabular format
How to Show Volume of Specific Vehicle Type?
Under "Volume" of Routing & Volume Tab, change the Vehicle Type dropdown boxHow to Export Calculated Link Demand Volume?
Under "Volume" of Routing & Volume Tab, Click Export Link Demand Volume ButtonHow to Import Back User Defined Link Volume?
Under "Volume" of Routing & Volume Tab, Click Import User-Defined Link Volume ButtonHow to Draw & Visualize Queue based on Queue Counte MOE Result Files?
- Click MOE Button
to open MOE Dialog
- Select Queueing Files (*.stz) tab, Click Add File button to add MOE results Files
- Click Calculate Queue button
- Check on/off Show Queue in Map check box
How to Create Static Routings from an OD Demand Matrix
Download Sample Excel Loading Sheet
Download Sample OD Matrix Text File
-
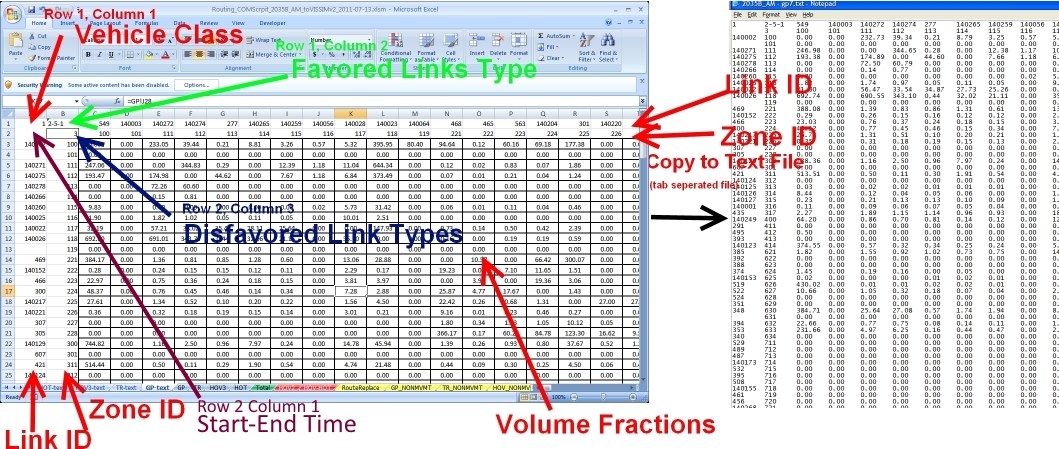
Open Excel and create an n × n OD matrix.
-
Cell (1,1) → Row 1, Column 1 specifies the
vehicle class. The default value is ALL.
If left blank, it will automatically be treated as ALL.
This field is optional, but if specified it must contain a single value.
Cell (1,2) → Row 1, Column 2 specifies the
favored link types (behavior types) for the selected vehicle class.
Multiple values are allowed and should be separated by dashes, for example:
4-5-6.
This field is optional; the default value is blank.
Cell (2,1) → Row 2, Column 1 specifies the
start and end simulation times in seconds, separated by a dash, for example:
0-5400.
This field is optional; if left blank, VHelper assumes a single time period of
0–99999.
Cell (2,2) → Row 2, Column 2 specifies the
disfavored (penalized) link types for the selected vehicle class.
Multiple values are allowed and should be separated by dashes, for example:
1-2-3.
This field is optional; the default value is blank.
The remaining cells in
Row 1 and Column 1 represent
VISSIM Link IDs.
The first row represents destination zone links, and the first column represents origin zone links.
The remaining cells in
Row 2 and Column 2 contain
Zone IDs, which are used as route names when static routings are created.
The matrix values represent the volume fractions for each OD pair.
To encourage General Purpose (GP) vehicles to remain on GP links
(and similarly encourage HOV vehicles to use HOV links),
VHelper adjusts link costs during path building by modifying each link’s effective distance.
For example, when building GP paths using favored link types
1-2-3 and disfavored link types 4-5-6:
- Favored link types become more attractive by reducing their effective length (typically to 70%–85% of the original length depending on settings)
- Disfavored link types become less attractive by increasing their effective length (typically to 300%–310% of the original length depending on settings)
- Copy the matrix content into a text file using Notepad. Direct copy-and-paste is recommended, although Excel Export/Save As can also be used.
-
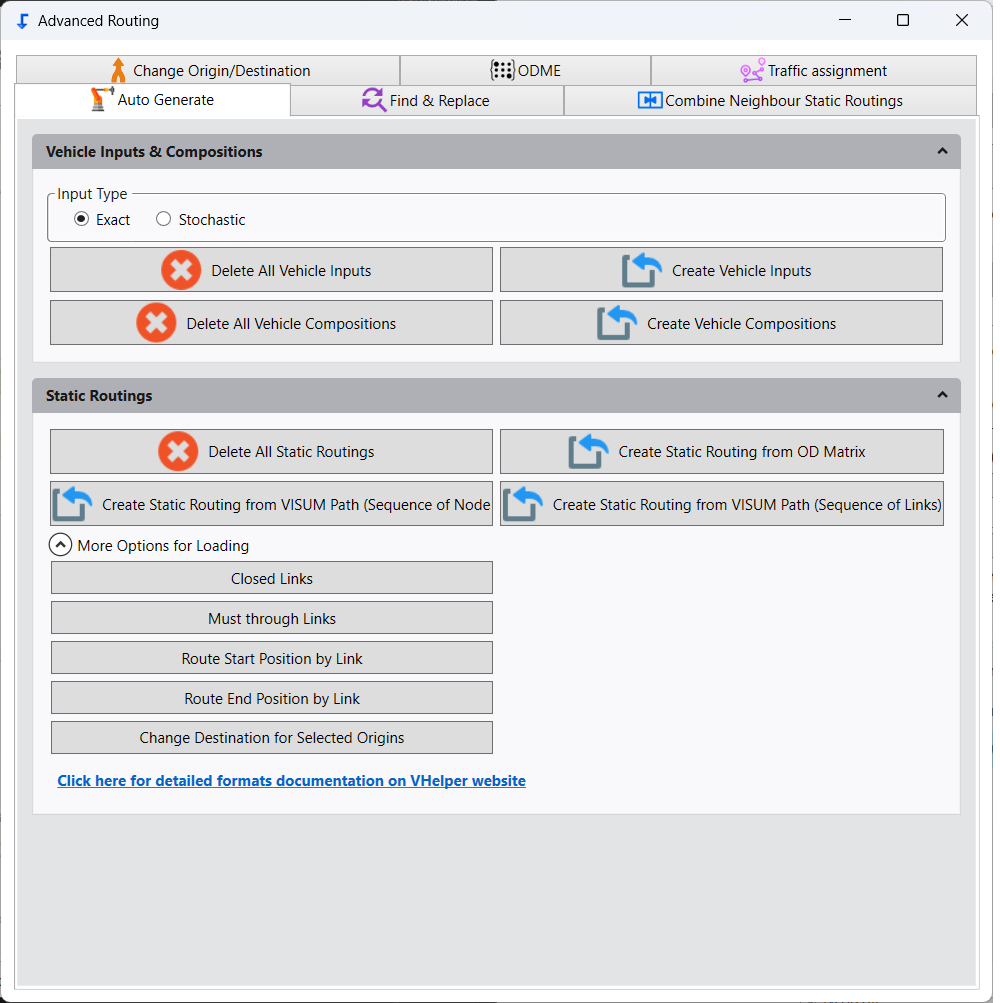
Click the Advanced Routing button to open the Advanced Routing dialog.
Select the Auto Generate tab, then click
"Create Static Routing from OD Matrix"
to open the file you created.
How to Create Static Routings from VISUM Paths
-
In VISUM, export the PrT Path file.
Make sure to include attribute either:
- Nodes-Concatenate-Number, or
- Links-Concatenate-Number
-
Click the Advanced Routing button to open the Advanced Routing dialog.
Select the Auto Generate tab, then click either button:
- Create Static Routing from VISUM Path (Nodes), or
- Create Static Routing from VISUM Path (Links)
-
VHelper automatically looks for a companion settings file named:
exported_path.att.setting.
This file specifies the vehicle class and time periods for the generated routings.
If the settings file is not found, the following defaults are used:
- Time Period: 0–99999
- Vehicle Class: ALL
-
Example settings file format:
$Setting:Class;TimePeriod;Favor;DisFavor999;0-10800;200;100 - Favored and disfavored link type penalties are configured in the Options dialog.
How to Create Vehicle Inputs by importing Tab Delimited Text File(s)?
Download a sample Vehicle Inputs text file
- Open Excel, Create as shown

- Copy all content to a text file in Notepad, preferably direct Copy Paste, don't use Excel Export function
- Click Advanced Routing button to open advanced routing dialog, select Auto Generate Tab, Click Create Vehicle Inputs Button
How to Create Vehicle Compositions by importing Tab Delimited Text File(s)?
Download a sample Traffic Compositions text file
- Open Excel, Create as shown
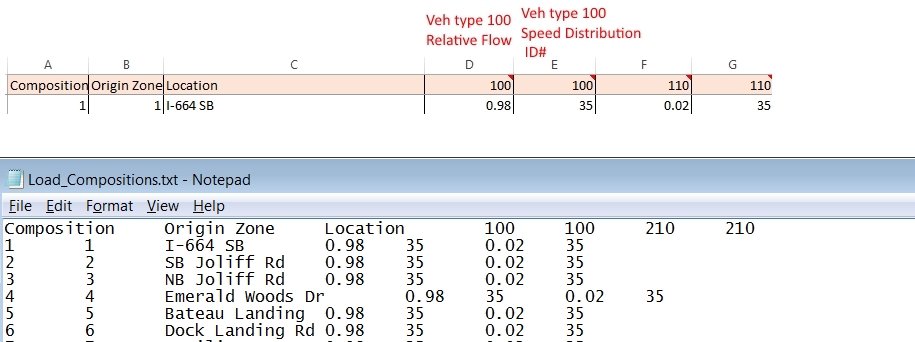
- Copy all content to a text file in Notepad, preferably direct Copy Paste, don't use Excel Export function
- Click Advanced Routing button to open advanced routing dialog, select Auto Generate Tab, Click Create Vehicle Compositions Button
How to Combine Static Routings?
- Routing Tab, Click Button to open the Advanced Routing Dialog
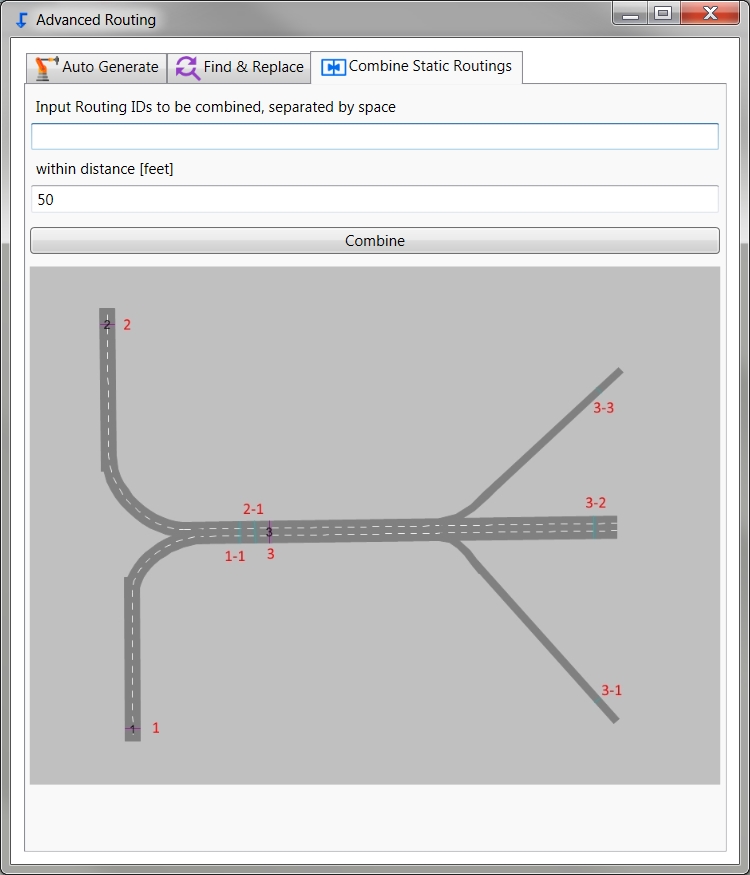
- Select "Combine Static Routings" Tab, Input Routing IDs you want to be combined (removed)
- For example, input routing decision 3, #3 and Routes 1-1 , 2-1 will be removed, and 1-1 and 2-1 will be extended(replaced) by routing #3's routes proportionally.
How to Filter Routes?
Under Routing Tab, you can filter by Routing ID(s), Vehicle Class(es), by a Path (Link/Connector IDs seperated by space) or any combo. Then Click Filter Routes button.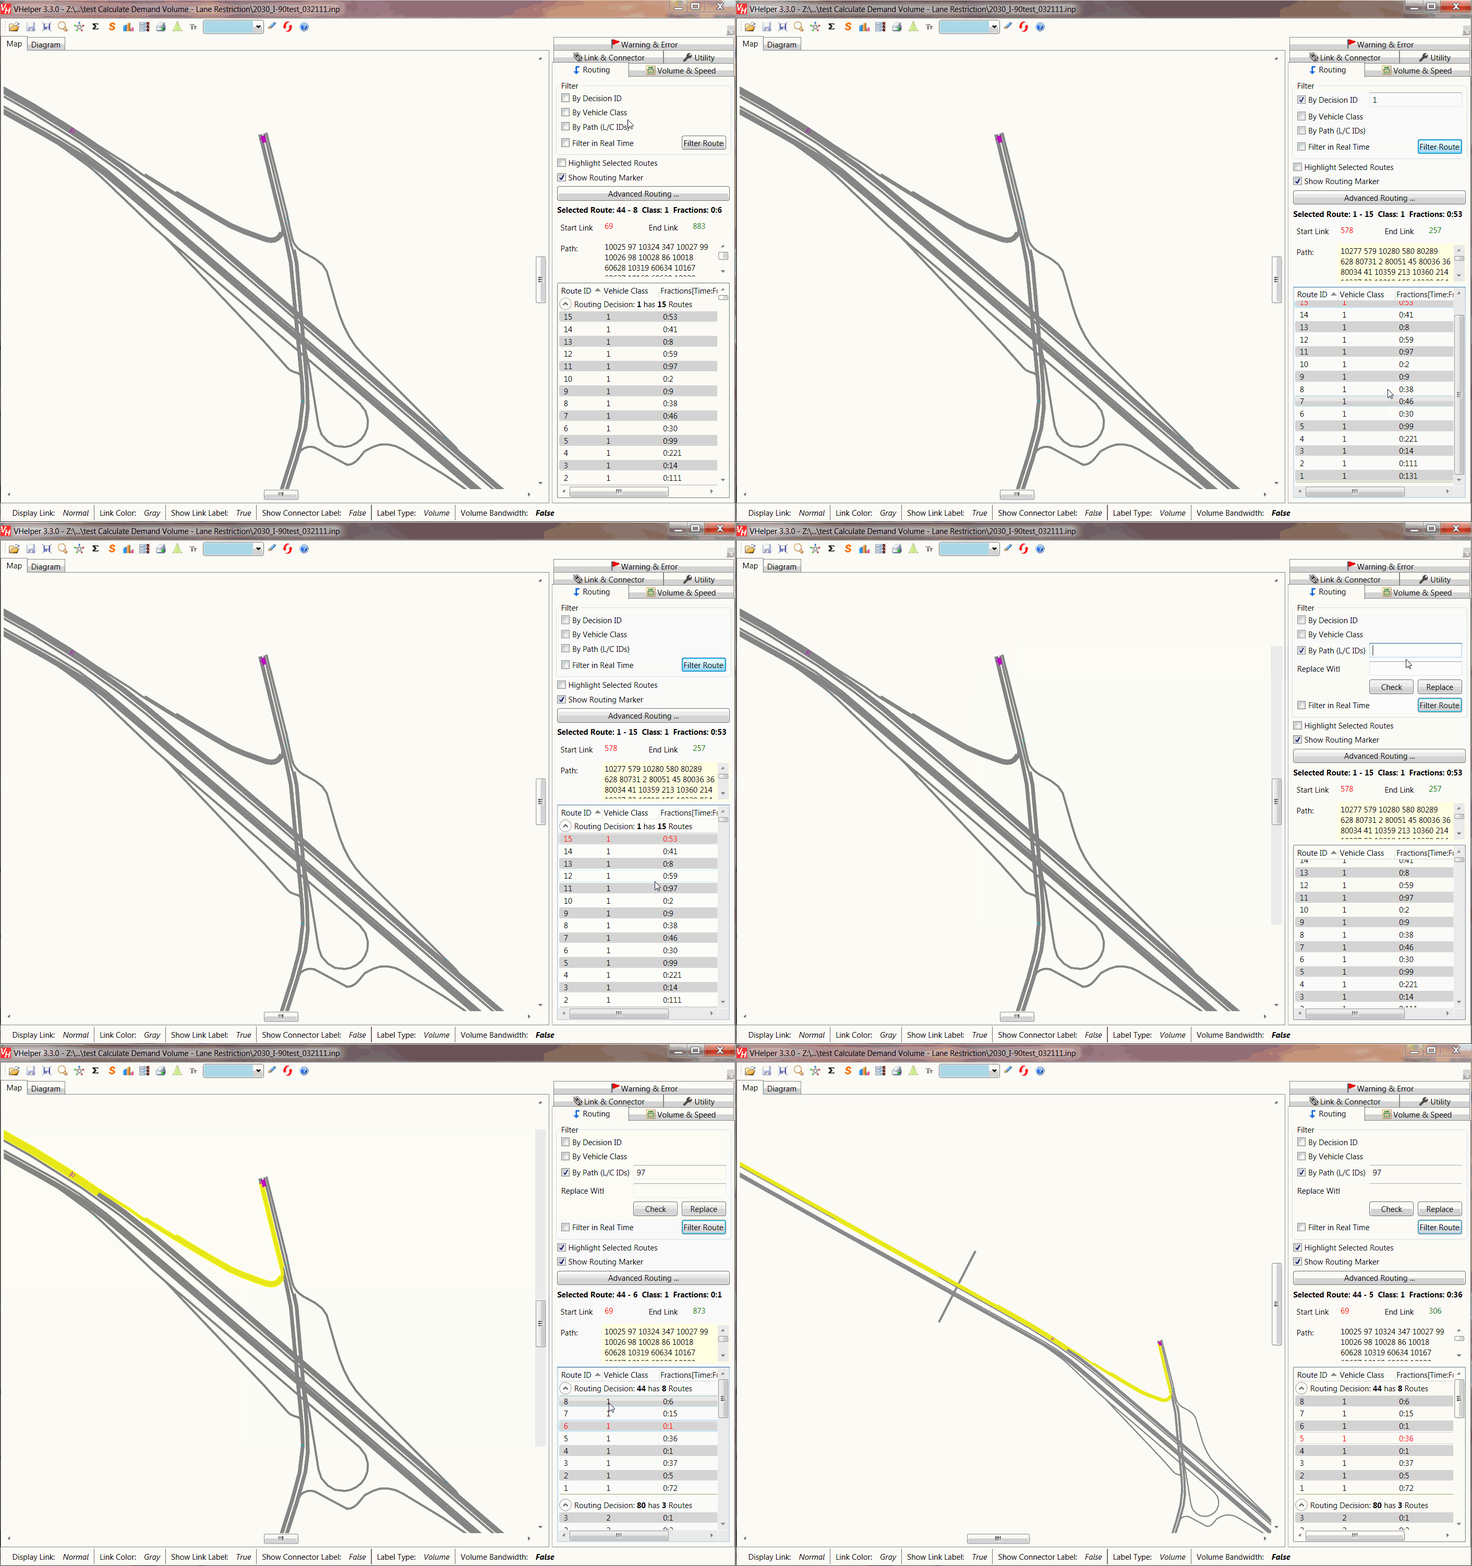
If you check Filter in Real Time, Routes will be filtered instantly when you change IDs or Paths, this could be slow when the network is large
How to Find & Replace Routes?
Select Routing Tab, check on Filter by Path check box, type in To Find and Replace with Pathes(a string of Link/Connectors seperated by space) or if you have a series of routes to be replaced, click Advanced Routing button to open advanced routing dialog, select first tab Find & Replace, click Add button to add one entry, click Import to import a comma (,) delimited text file contains To Find, To Replace, Vehicle Class information. Click Replace to process the job.How to Create Data Collection Points along a Path?
- Click MOE Button
to open MOE Dialog
- Select Data Collection Point tab, Type in a path (a string of Link/Connectors)
- Click Create New DCP Button
How to Quickly Manipulate Lane Cloesures along a User Defined Path (a string of Link Connector IDs)?
Select Link & Connector Tab, Click corresponding Lane Cloesures buttons. If you want to manipulate a path, first check on Filter by ID, then type in a string of IDs Under the view, Lane Cloesures will be represented as 1:3-4;3:1-2, it means Lane 1 closed for vehicle class 3 and 4, Lane 3 closed for vehicle class 1 and 2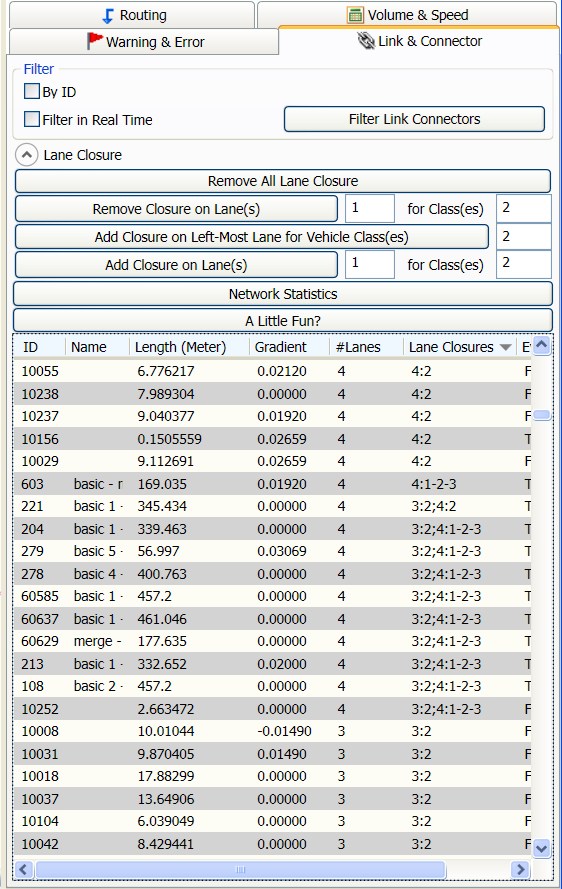
How to Check Coding Error?
- Select Warning/Error Tab, Click Check Error button

- Press Ctrl + K shortcut key
Ready to use VHelper?
Review the latest release notes or contact us if you need help with a workflow.